Wednesday, October 2, 2013
I'm Still Here!
I'm still here, but have just been totally swamped! Between back to school, sports and activities, plus my paper crafting business I have neglected the blogging world. I have been working hard on my craft room and hope to post pictures soon. I need my hubby's help to install the cabinets, so that has delayed the whole process. Please keep checking in! I will become more disciplined at blogging, I promise.
Wednesday, August 28, 2013
Craft Room Redo
I will be moving my lovely craft room from the basement to our main floor. I find that having my craft room in the basement means that I always need to choose between, house work, making dinner, spending time with the kids OR doing crafts. Most of the time everything else comes before crafting. I have a new baby and being three floors away from him during nap time makes me a little nervous. I also run a small paper crafting business and when I have club or classes at my place I am constantly running downstairs to grab things from my craft room. I absolutely love my basement craft room. A lot of thought and planning went into designing my craft room and it makes me a little sad to be moving it. I am moving my craft room to our den. It's a bit smaller so I will need to rearrange my existing furniture. My best friend Tara helped me pick out new wall colours and the layout of my new room. Tara is such a talented designer and is always helping with colours and design. My new craft room is going to be a very trendy yellow and grey. I already have lots of white Ikea furniture, so I think it will come together nicely. Stay tuned for my craft room makeover!
This is the den where my new craft room will be.

This is my basement craft room. I will love all the natural light in the den provided by the big window, but it will take up lots of wall space! I'm going to need to be smart with my organization. I have ten plus years of craft supplies, not to mention my obsession with Michael's grab bags!


This is the den where my new craft room will be.
This is my basement craft room. I will love all the natural light in the den provided by the big window, but it will take up lots of wall space! I'm going to need to be smart with my organization. I have ten plus years of craft supplies, not to mention my obsession with Michael's grab bags!
Monday, August 26, 2013
Pitching in! How We Do Allowances and Chores in Our Family
Do you sometimes feel like your children think you have a never ending supply of money on the money tree out back?
Well I have to admit that I have been guilty for spoiling my kids and in the last eight years of being a parent. I am always learning and constantly tweaking my parenting skills. When I began my journey as a parent at the age of twenty one, I started off making some major mistakes parenting wise. I think at that point in my life I had not yet learned some tough money lessons myself.
I am a gift giver by nature. I love to receive gifts and I love to give gifts. I recently took the Five Love Languages quiz online (click here to take the quiz) and, no surprise here, my top love language is receiving gifts! This does not mean that I'm superficial, it just means that I love the thought and attention that goes into giving a gift. With that said, I have been known to over indulge my children. I started to notice that they would ask me to buy them stuff at the store every time we went out. Not only did they ask for everything in sight, but if I bought into their impulse items they would play with it for about five seconds before being bored.
I implemented an allowance because I felt that my children needed to understand first how to earn money and second how to budget and plan for expenses. I think that it's really important for children to actually handle money. In this day in age everything is electronic and it would actually be easier for me to transfer money into their bank accounts online, but I prefer to hand them their hard earned allowance in cash.
This is how chores and allowances work in our home:
-each child is assigned chores for the month. I start my kids off with chores and allowance once they start school. The younger kids usually have one small job like organizing the shoes on the rack or putting the clean cutlery away. As the kids get older they take on more responsibility.
-children under nine years old make $5 a week and children nine years old and up make their age in dollars each week. If you are ten years old you make $10 a week/$40 a month. I'm not sure how we decided nine years old was the magic age. I think we decided back in the day when one of our children wanted to make more money and take on more chores, so we have just stuck with nine years old to make your age in dollars.
-each year that the older kids get a raise in allowance, they take on more chores.
-my children are also expected to keep their bedrooms clean and clear their plates from the table. This does not fall under their chores, as I feel like everyone needs to pick up after themselves. There are still responsibilities in being part of the family and you shouldn't get paid to clean up after yourself.
I know this may seem like a lot of money to some of you, but besides clothes, activities and necessities my children buy everything else on their own. My kids usually keep some cash in their wallets or piggy banks, and the rest goes into their bank account. If the school is selling items as a fundraiser (I still buy hot lunches and food items) like pencils or book fair items my kids buy them.
I don't usually have my children bring their money to town, unless we have discussed beforehand a purchase they would like to make. I find the money burns a hole in their pocket and they would buy anything in sight. I want my children's purchases to be conscious and thought out.
If we go on a family vacation my children are expected to buy their own souviners. It brings a smile to my face when my children say "mom this is what I'm saving for", instead of "mom can you buy me this".
I pay out the allowances once a month. My pay day is the kid's pay day. I withdraw their money, put it in an envelope and pay them out for the last month.
I'm not a financial advisor, nor am I an expert on parenting. I have found that in my family this method has cut back on my children asking me for "stuff". I have also found that when they are spending their own money lots of the "stuff" really isn't all that important to them.
Hope this helps and feel free to leave me a comment!
Wednesday, August 21, 2013
Meal Planning for a Large Family
I'm not sure if anyone else is feeling the pinch of all the back to school costs, but we sure are! With five children starting school in a couple of weeks, it feels like there are never ending expenses. Last year I felt like we were over spending big time on our grocery list and decided to become more organized in order to save money on groceries. This is how I meal plan for our family of eight.
Print off a blank calendar for the month. I get my blank calendar from this website here and did I mention its free!

Then I write down all the dinners for the month on the calendar. Our pay day is usually around the 10th of each month so I plan out our dinners starting and ending on the 10th of each month.
You will notice that I leave two spots to eat out each month on the calendar. It's nice to give ourselves a night off from cooking here and there and it's planned for in our budget.
I also make sure that I have a couple of quick meals each week as our schedules get quite frantic. Here are a few ideas for dinners that can be made in less then 20 mins:
-Breakfast for dinner
-Prawns on Caesar salad
-Taco salad
-Perogies and Salad
-Burgers and Salad
There are also some crock pot recipes that I searched on Pinterest.
- Italian chicken
- Scalloped potato and cubed pork
-Cheesy chicken spaghetti
And I can't forget my family's favourite recipes. I ask the kids what they want for dinner. Everyone gets to pick one night.
-Tacos
-Steak, potato and grilled veg
-Chinese (homemade stay tuned I will post how I make it for cheap!)
- Lasagna
-Salt and pepper wings with cut vegetables and dip

I make a list of all of the meat I will need for the month and buy it at Costco. I also make a list of all the other ingredients I will need to make the dinners for the month. I will buy all the non perishable items at the beginning of the month for the entire month. Each week I use my dinner calendar and make a list of fresh items I will need for the week, along with lunch and breakfast supplies.
Once you have established a good dinner plan you can reuse it each month (change a few dinners around so it doesn't feel repetitive).
This probably looks like a lot of work, but if you spend an hour planning out the month you will cut
out all of those last minute shopping trips. I managed to cut approximately $500 out of my monthly food budget.
Here are some more tips on how I save on school lunches:
-pack water instead of juice boxes (I purchased lunch kits that came with stainless steal water bottles)
-bake cookies, muffin, and other backed goods instead of pre packaged snacks. Do one big baking
day a month and freeze your items.
-pack a couple pieces of fruit for snacks or cut veggies (economical and healthy)
-use left over meats from dinner to make wraps and sandwiches (no nitrates!)
Hope you find this post useful!
Print off a blank calendar for the month. I get my blank calendar from this website here and did I mention its free!
Then I write down all the dinners for the month on the calendar. Our pay day is usually around the 10th of each month so I plan out our dinners starting and ending on the 10th of each month.
You will notice that I leave two spots to eat out each month on the calendar. It's nice to give ourselves a night off from cooking here and there and it's planned for in our budget.
I also make sure that I have a couple of quick meals each week as our schedules get quite frantic. Here are a few ideas for dinners that can be made in less then 20 mins:
-Breakfast for dinner
-Prawns on Caesar salad
-Taco salad
-Perogies and Salad
-Burgers and Salad
There are also some crock pot recipes that I searched on Pinterest.
- Italian chicken
- Scalloped potato and cubed pork
-Cheesy chicken spaghetti
And I can't forget my family's favourite recipes. I ask the kids what they want for dinner. Everyone gets to pick one night.
-Tacos
-Steak, potato and grilled veg
-Chinese (homemade stay tuned I will post how I make it for cheap!)
- Lasagna
-Salt and pepper wings with cut vegetables and dip
I make a list of all of the meat I will need for the month and buy it at Costco. I also make a list of all the other ingredients I will need to make the dinners for the month. I will buy all the non perishable items at the beginning of the month for the entire month. Each week I use my dinner calendar and make a list of fresh items I will need for the week, along with lunch and breakfast supplies.
Once you have established a good dinner plan you can reuse it each month (change a few dinners around so it doesn't feel repetitive).
This probably looks like a lot of work, but if you spend an hour planning out the month you will cut
out all of those last minute shopping trips. I managed to cut approximately $500 out of my monthly food budget.
Here are some more tips on how I save on school lunches:
-pack water instead of juice boxes (I purchased lunch kits that came with stainless steal water bottles)
-bake cookies, muffin, and other backed goods instead of pre packaged snacks. Do one big baking
day a month and freeze your items.
-pack a couple pieces of fruit for snacks or cut veggies (economical and healthy)
-use left over meats from dinner to make wraps and sandwiches (no nitrates!)
Hope you find this post useful!
Sunday, August 18, 2013
Season of Style Card Class
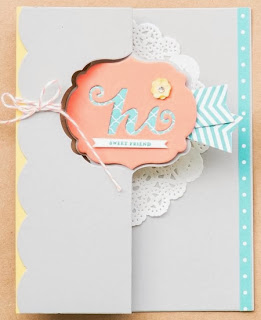
I know, I know why is this crazy person talking about Christmas in August. Well with a family of eight I have to be ahead of the game in order to stay somewhat organized. I am planning my fall classes right now and am super excited about these Christmas cards I made. I used Stampin'Up's Season of Style Designer Journaling Tags to create twenty, that's right folks, twenty cards! The tags only cost me $5.95!! I also used one 12x12 piece of Stampin'Up's Season of Style Designer Series Paper, half a role of the Season of Style Washi Tape and card stock to mat everything on and voila twenty hip and trendy Xmas cards. Check out my website here to see my upcoming classes or my online store here to purchase the supplies.

Friday, August 16, 2013
Thinlit Card Dies From Stampin'Up
So as a Stampin'Up demonstrator I am super excited to show you their new Thinlit Card Dies. These templates are used in your Big Shot Sizzix machine to create adorable interactive cards. Click here to watch the You Tube video on how to create these cards. Also take a look at some of these great card ideas using the Thinlit Card Dies. To purchase these Card Thinlits from my online store click here. Also stay tuned for my upcoming class featuring these dies. Dates will be posted on my website!


DIY Custom Frame
So I purchased some prints from my friend's amazingly talented husband Russ Layton. The picture below is one of the two prints I purchased from him. I have had these prints just sitting around waiting to be hung, but was waiting to have them framed. The pictures are not your typical 5x7 or 8x10 so I knew that having them custom framed would run me approx $200, ouch! I just updated my bedroom wall colour from a warm Louisiana Hotsauce to an icy Platnum Plate. I absolutely love how my black and red furniture pops against the grey walls, but my Winners Homesense artwork just wasn't cutting it. The framed artwork that I bought at Winners was about the same dimensions as Russ' cool city scape paintings. I decided to see if I could swap my old painting for my new prints from Russ. I peeled back the paper on the back of the frame, carefully pulled back the wire anchors that were holding the picture in place and seperated the picture from the mat (it was glued down to the mat so I did have to rip it off). In the end I ended up saving myself tons of money in custom framing! I think the artwork in frames from Winners originally costed me under $20, so I will now give myself a pat on the back. Definitely worth going to check out the art section in a store like Winners just for the frames, never mind the artwork! Russ' art looks great in my newly painted room and I am enjoying my mini bedroom makeover.

Subscribe to:
Posts (Atom)